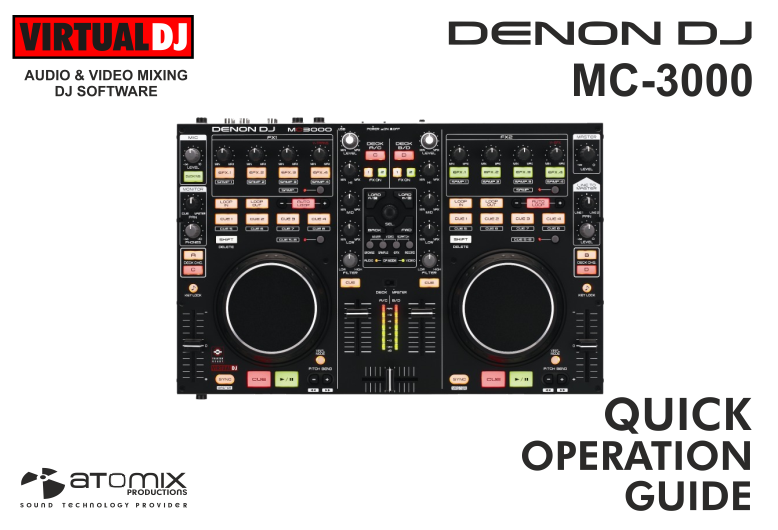
DENON DJ MC-3000
SETUP
Step 1. Connections
Connect the MC-3000 to a USB port of your computer using the provided USB cable. Connect a pair of amplified speakers to the Master Output at the rear panel of the unit and your Headphones at the front socket.
Step 2. Drivers
Windows : Download and install the Denon ASIO drivers from https://www.denondj.com/downloads#legacy,
Mac OSX : No drivers is required to be installed for Mac OSX computers.
Update the firmware of the unit to the latest version from http://denondj.com/products/view/mc3000
Step 3. VirtualDJ
Install VirtualDJ from https://www.virtualdj.com/download/index.html (in case you have not done already)
Start VirtualDJ and login with your Account credentials. A Pro Infinity, Pro Subscription or Plus MC-3000 Controller License is required.
Find a detailed installation procedure at https://www.virtualdj.com/manuals/virtualdj8/quickstart.html
A detection window will appear when the unit is first connected with VirtualDJ, verifying proper connection
Click on the MC3000 button in order VirtualDJ to apply the pre-defined audio configuration using the built-in sound-card of the unit. Speakers need to be connected to the rear panel of the unit in this case.
Click to OK
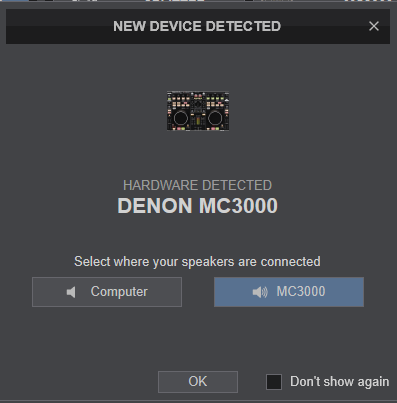
The unit is now ready to operate with VirtualDJ.
CONTROLS
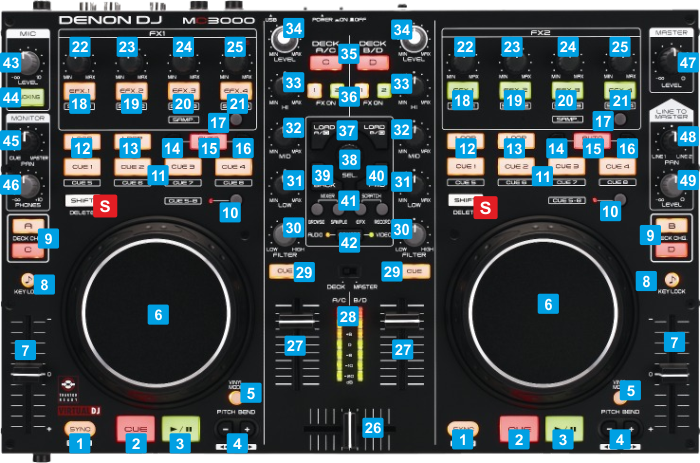
KEY
ACTION
SHIFT (SECONDARY) ACTION
In Loop In Adjust mode, use the Jogwheel to fine adjust the Loop In (Start) point of a manual loop
In Loop Out Adjust mode, use the Jogwheel to fine adjust the Loop Out (End) point of a manual loop
In Loop Move Adjust mode, use the Jogwheel to the triggered loop through track's time
The left buttons assign Decks 1 or 3 to the Left side of the unit.
the right buttons assign Decks 2 and 4 to the Right side of the unit
LED next to button will be on when the Hotcue 5-8 bank is selected
In HotCue 5-8 bank : Assign a Hotcue 5 to 8 or jump to that Hotcue point if assigned
In Hotcue 5-8 bank : Delete the Hotcues 5 to 8
While in FX mode, hold button down and then press any of the EFX1,EFX2,EFX3 buttons to toggle between the Single and Multi FX mode
While in Sampler mode, hold this button down and then use the EFX1 and EFX2 to select the previous/next Sampler Bank or EFX3 and EFX4 buttons to select the previous/next Sampler Trigger mode.
While in Sampler mode, hold this button down and then use the TRACK encoder to adjust the Master Volume of the Sampler
In Multi FX mode : Triggers the selected Effect of the FX1 Slot
In Sampler mode : Triggers the Sample 1 of the selected Sampler Bank
While SAMP button is held, use EFX1 to select the previous available Sampler Bank
In Multi FX mode : Selects the next available Effect for the FX1 Slot
In Sampler mode : Stops Sample 1 of the selected Sampler Bank.
In Multi FX mode : Triggers the selected Effect of the FX2 Slot
In Sampler mode : Triggers Sample 2 of the selected Sampler Bank
While SAMP button is held, use EFX2 to select the next available Sampler Bank
In Multi FX mode : Selects the next available Effect for the FX2 Slot
In Sampler mode : Stops Sample 2 of the selected Sampler Bank.
In Multi FX mode : Triggers the selected Effect of the FX3 Slot
In Sampler mode : Triggers Sample 3 of the selected Sampler Bank
While SAMP button is held, use EFX3 to select the previous Sampler Trigger mode
In Multi FX mode : Selects the next available Effect for the FX3 Slot
In Sampler mode : Stops Sample 3 of the selected Sampler Bank.
Right-side button : Triggers the selected Video Effect on Master
In Sampler mode : Triggers Sample 4 of the selected Sampler Bank
While SAMP button is held, use EFX4 to select the next Sampler Trigger mode
Right-side button : Docks/un-docks the FX GUI of the selected Video Effect in Browser
In Sampler mode : Stops Sample 4 of the selected Sampler Bank.
In Multi FX mode : Adjusts the 1st Parameter of the selected Effect of the FX1 Slot
In Sampler mode : Adjusts the Volume of Sample 1
In Multi FX mode : Adjusts the 1st Parameter of the selected Effect of the FX2 Slot
In Sampler mode : Adjusts the Volume of Sample 2
In Multi FX mode : Adjusts the 2nd Parameter of the selected Effect of the FX2 Slot
In Sampler mode : no action
In Multi FX mode : Adjusts the 1st Parameter of the selected Effect of the FX3 Slot
In Sampler mode : Adjusts the Volume of Sample 3
In Multi FX mode : Adjusts the 2nd Parameter of the selected Effect of the FX3 Slot
In Sampler mode : no action
Right-side knob : Selects the previous/next Video Effect on Master
In Sampler mode : Adjusts the Volume of Sample 4
Right-side knob : Adjust the 1st Parameter of the selected Video Effect on Master (if available)
In Sampler mode : no action
The Left button assigns Deck 1 or Deck 3 to the left side of the mixer.
The Right button assigns Deck 2 or Deck 4 to the right side of the mixer
Push to set focus to Folders list or expand/collapse sub-folders if focus is in Folder List
SAMPLER : Shows the Sampler in the Sideview
EFX : Enables/disables Sandbox
RECORD : Start/stop recording
SAMPLER : Opens the VIDEO center panel
EFX : Opens the SCRATCH center panel
RECORD : Open the MASTER center panel
If AUDIO is on, the crossfader will bend audio signals from the Left/right assigned decks.
If VIDEO is on, the crossfader will blend only Video from the Left/Right assigned decks.
If both are on, the crossfader will blend both Audio and Video from the left/right assigned decks
When in minimum (left) position, Decks that have the CUE/PFL enabled will routed to the Headphones Channel
When in maximum (right) position, the audio signal from the Master Output will be routed to the Headphones channel
In all other mid-positions the audio signal of the above will be blend in Headphones
* Note: The device is offering Full Stems controls. See details at EQ Modes
FRONT & REAR PANELS


DESCRIPTION
Even though the Inputs are directly routed to the Master Ouput, those are also part of the USB Audio Interface so can be included in the Audio setup and used as Line Ins and recorded as well
